
| Well in order to follow this tutorial, you will need 3D Studio Max 4.0+, and Adobe Photoshop 6.0+. If you'd like, I can send you the .PSD or the .MAX files.Enjoy... |
|
Open 3D Studio Max, and create a new document. |
 |
|
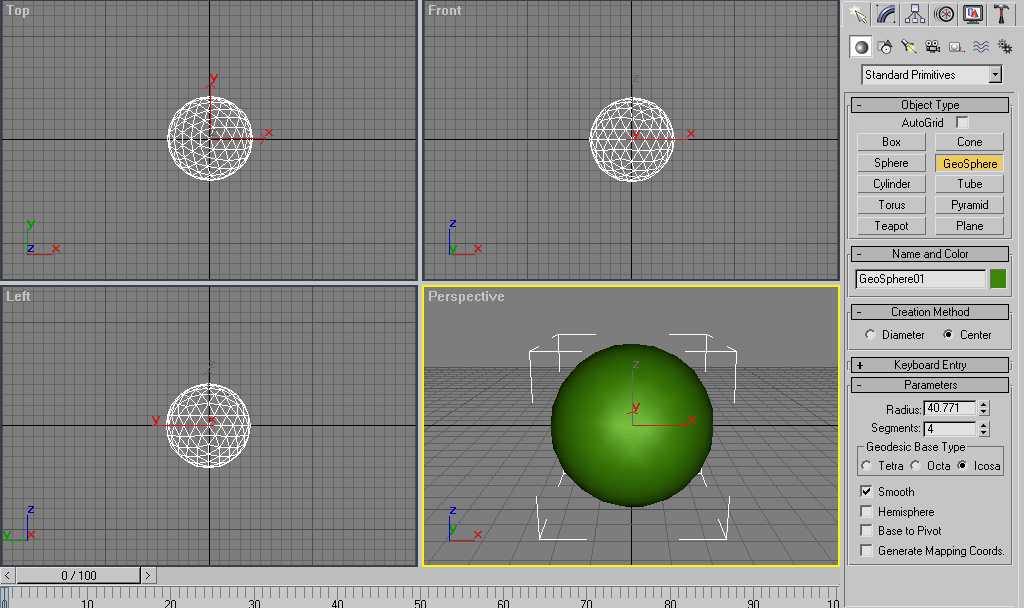
Now goto the Standard Primitives, and choose the Geosphere. And create a medium sized circle, like shown to the right. Color doesn't matter right now, so just use the color chosen. |
 |
|
Now press F3 to create the wire frame. Right click on the sphere, and goto Convert to > Editable Mesh. Right click again, and Sub-Objects > Polygon. |
|
|
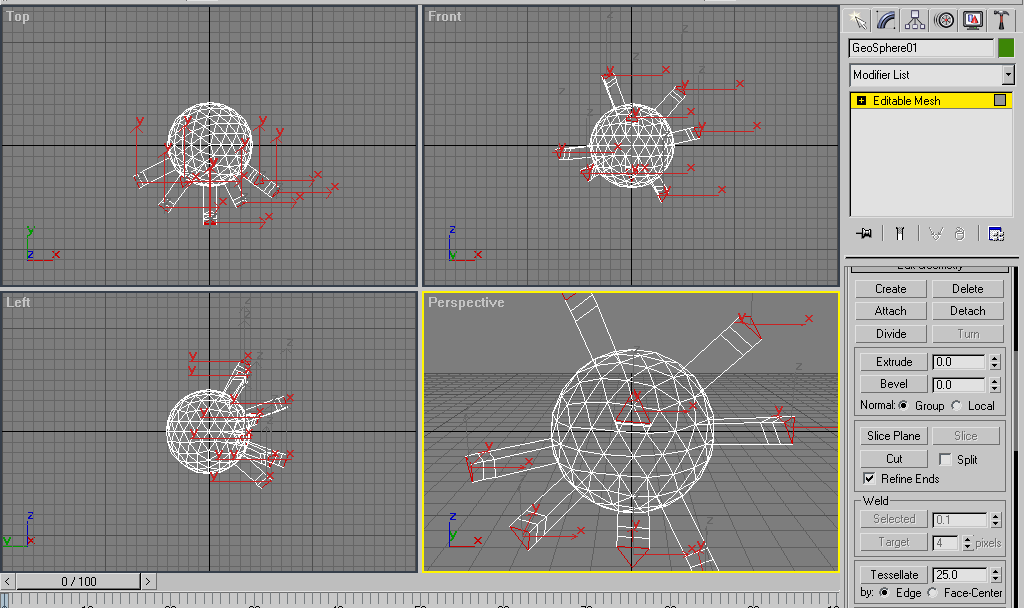
Now you should see triangles within the sphere, like shown to the right. Click on a triangle to highlight it, hold CTRL, and select a bunch or triangles, don't choose many, maybe 6 or 7. Now if you look to your right, you should see a little scroll box, scroll down until you see Extrude:. Add about 40 or so, and hit enter. (If you want, you can select the Uniform Scale, and make the crystal pointy, I chose not to, but it makes them look like spikes.) |
 |
|
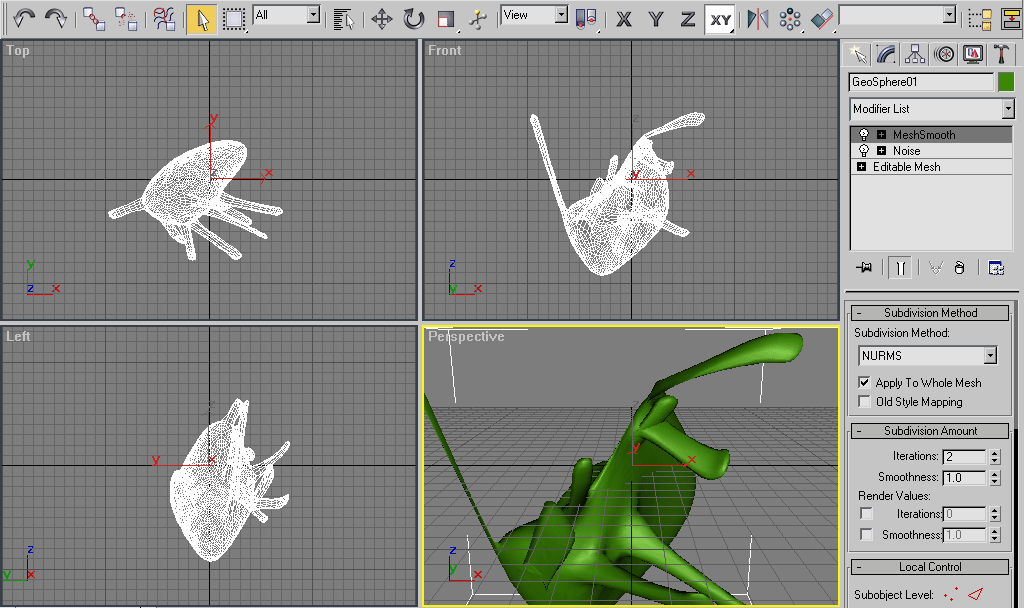
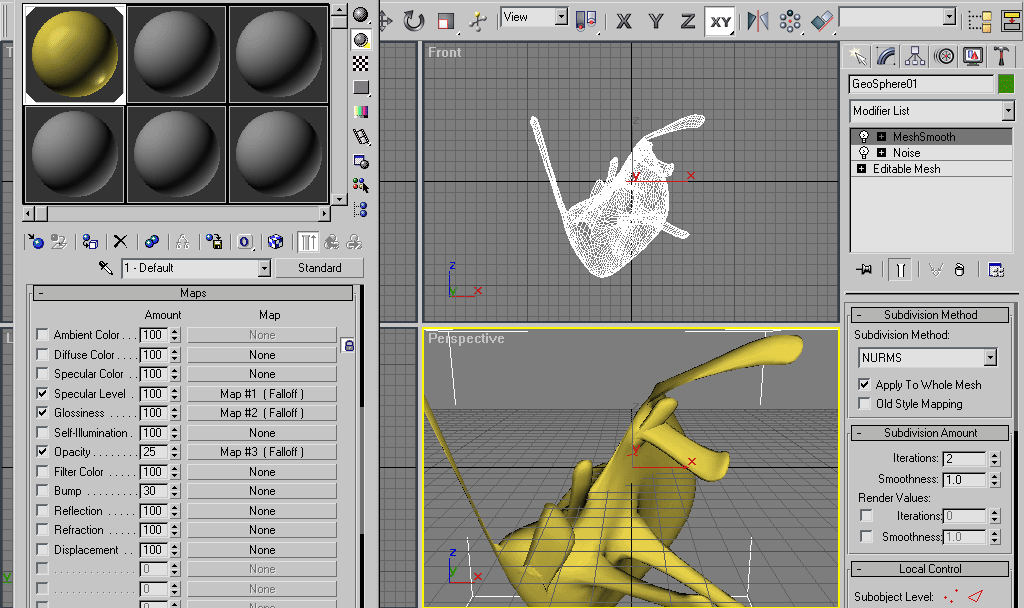
Ok now that you have made the crystals, you can get rid of the wireframe by pressing F3, and now you should see the regular 3D Sphere with crystals or spikes coming out. Right click on the sphere once again, and choose Convert To > Editable Mesh. Goto the Modifying List  , and select Noise from the drop menu. Add the following settings: , and select Noise from the drop menu. Add the following settings:Seed:1 Scale:80 X:100 Y:20 Z:200 Now goto Mesh Smooth from the drop menu, and add the following settings: Iterations:2 Smoothness:1 |
 |
|
Alright now is where you choose the color you want for your abstract, and add some character to it. Goto Rendering > Material Editor. You should see a box next to Ambient: Diffuse: and Specular: Click on the Ambient box, and choose the color you wish, and click Close, it should choose the color for both Ambient and Diffuse. I chose a mustard yellow, Red:237 Green:216 and Blue:75. Now choose your specular color, choose something that will blend nicely with your Ambient and Diffuse color, make sure its a lighter color. I chose a lighter yellow, Red:243 Green:240 Blue:163. Now you have your colors set. |
|
|
Now the part where you add some character to your shape. Stay in Material Editor, and scroll down, you should see a box that says Maps. Click it. Check off Specular Level, Glossiness, and Opacity. Now for Specular Level, click the box to the right of it that says None. And choose Falloff. Click Ok, and go back to Default by choosing it from the drop menu. And now do the same for Glossiness and Opacity. For opacity amount, put 25. Now click  , and OK. , and OK.
|
 |
|
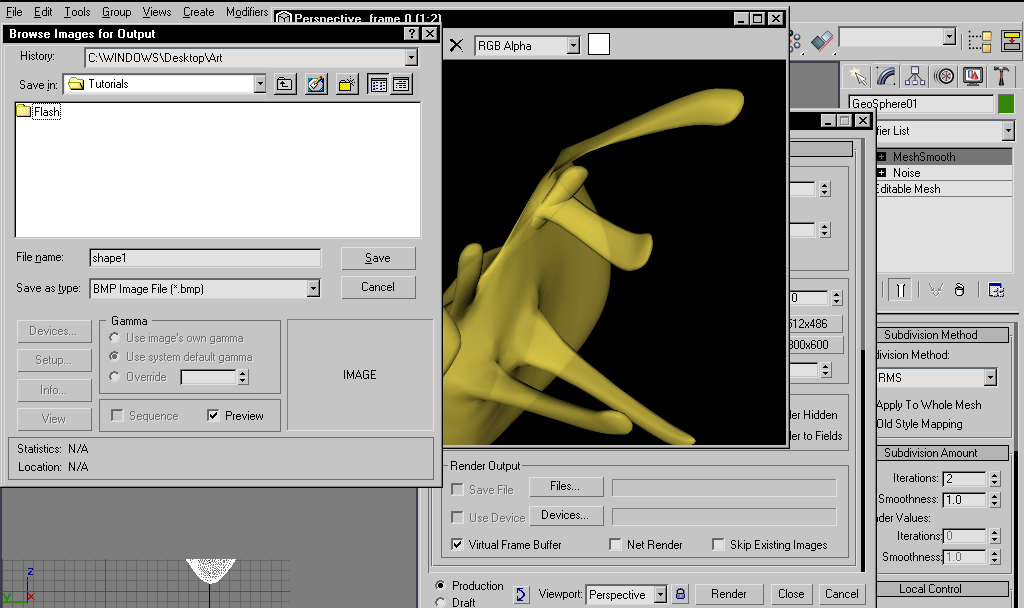
Alright, now for the Rendering. Goto Rendering > Render. For width put 1024, and height put 768. (if you want to make a different size than go right ahead.) Make sure you are rendering the Perspective viewport, and click Render. After you've rendered, click the disk and save it as a .BMP. Name it shape1. |
 |
|
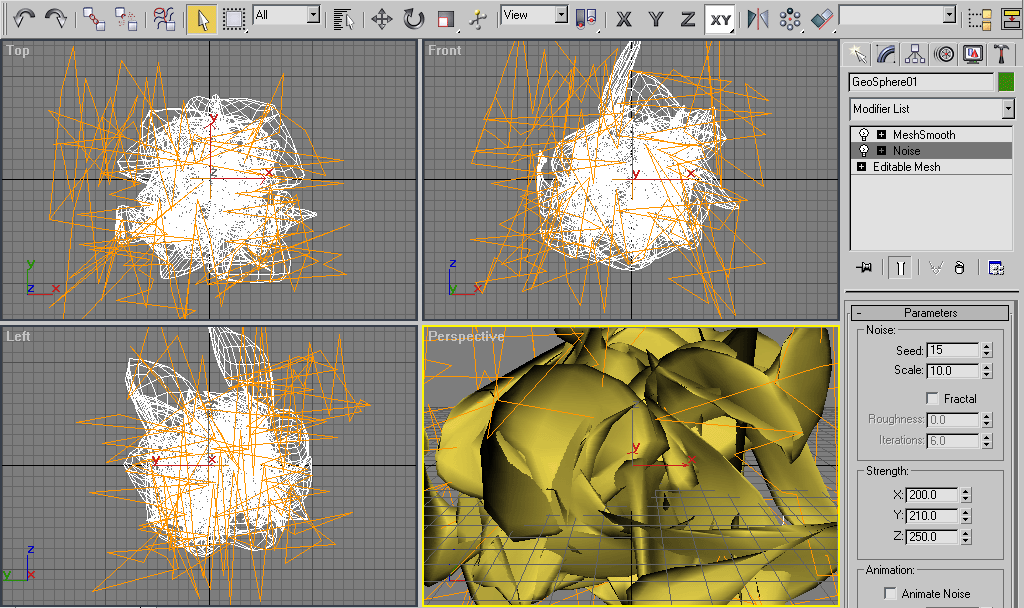
Ok now comes the part where you need to make more shapes, and its very simple. Just go back to the Modifier List, and click on +Noise.(Not from the drop menu, it should already say it.) Add these settings: Seed:15 Scale:10 X:200 Y:210 Z:250 And now Render the shape like before, with the same Height and Width as before. This will be the base background. Name it background.BMP. Now go back into Rendering > Render. Scroll down until you see Force Wireframe. Check that, click Render. This will render the wireframe of the background. Save it as bgwire.BMP. |
 |
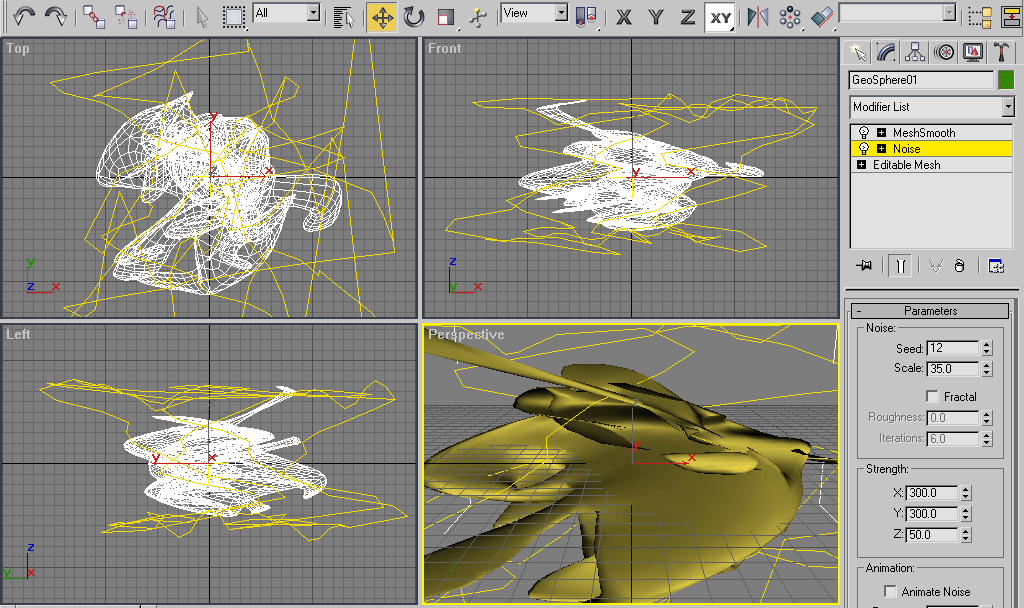
 Ok, we'll make 3 more shapes like the first one made, Go back to +Noise in the Modifier List, and add these settings: Seed:12 Scale:35 X:300 Y:300 Z:50 And now you can render it. Name it shape2.BMP. (Make sure before you render that you un-check Force Wireframe). |
 |
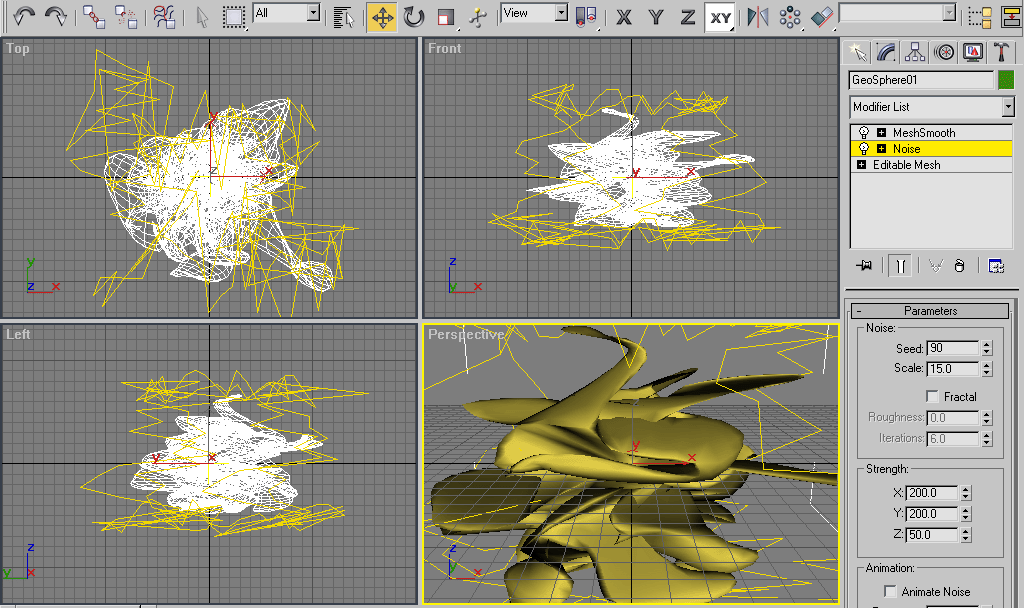
 Now for the 3rd shape, Go to +Noise in the Modifier list, and put these settings: Seed:90 Scale:15 X:200 Y:200 Z:50 And once again render it, and it as shape3.BMP. |
 |
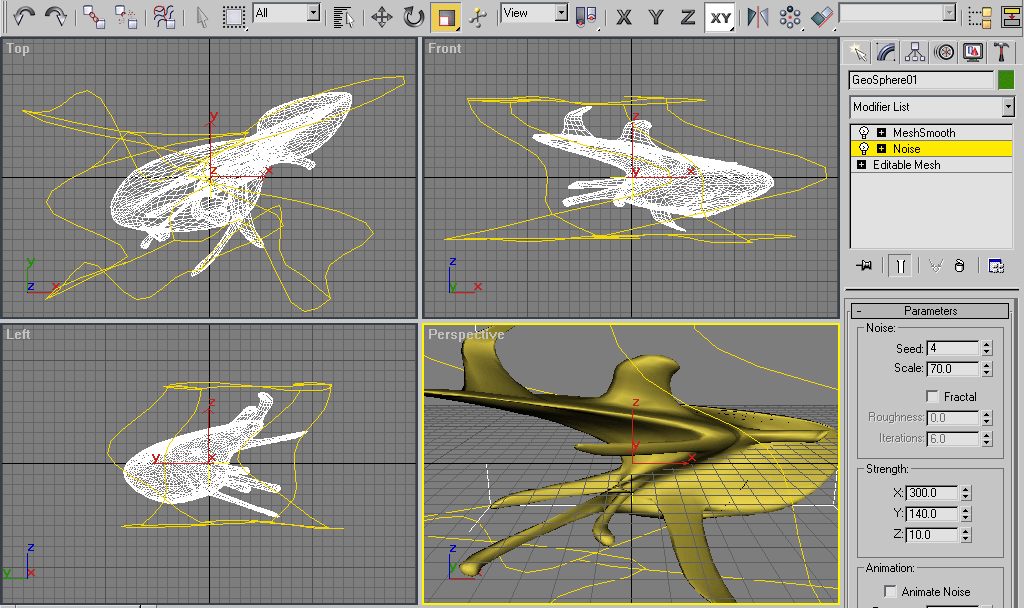
 Ok, time for the final shape, goto +Noise in the Modifier list. Add these settings: Seed:4 Scale:70 X:300 Y:140 Z:10 And render it, save it as shape4.BMP. Then go back to Rendering > Render, and Render the Wireframe(Force Wireframe.), and save it as shape4wire.BMP. And now you are done with the 3D Studio Max part! |
 |
| OK now is where Photoshop comes in. And this is where things get tricky and difficult. So pay close attention from here on. |
 Open Photoshop, and make a new document, 1024x768 pixels.(Or whatever size you rendered your shapes at.). Mode:RGB Color, and White. (Note: I will be editting this wallpaper at 50%, which you can do by going to Windows>Show Navigator, and entering 50%. I do this so that I can view the whole wallpaper as Im making it. I suggest you do the same. It will still save as 100%. All of my screenshots that you will see will be at 50%.) |
|
 Now minimize that document, and open background.BMP which you had rendered earlier. Select the whole image with the Rectangular Marquee Tool, and goto Edit > Copy. Now go back to your new document and goto Edit > Paste. Name this layer Abstract Background.(Right click on layer, Layer Properties.) Now in the layers pallette, you should see something that says Opacity, set it at 30%. |
 |
 Alright, now goto File > Open, and open bgwire.BMP. Select the whole image with the Rectangular Marquee tool, and goto Edit > Copy. Now go to the document that you have been working on, and goto Edit > Paste. Choose Overlay from the drop menu in the layers pallette, and set the opacity at 10%. Name this layer Background Wireframe. |
 |
 Okay, now open shape1.BMP. And once again, select the whole image with the Rectangular Marquee tool, and goto Edit > Copy. Now go back to the document you've been working on, and goto Edit > Paste. Name this layer Shape 1. |
|
 Now comes a tricky part, select the Magic Wand Tool  , and click on the black background, which should select it, hit delete. And do this until all of the black background is gone. If you are having trouble with this, view the picture to the right. Now set the opacity of this layer to 40%. , and click on the black background, which should select it, hit delete. And do this until all of the black background is gone. If you are having trouble with this, view the picture to the right. Now set the opacity of this layer to 40%.
|
 |
 Once again, open shape2.BMP, select the whole image with the Rectangular Marquee Tool, goto Edit > Copy. Now go back to your document, and goto Edit > Paste. Name this layer Shape 2. And now use the Magic Wand Tool, and delete all of the black away. Set the opacity of this layer at 40%. |
|
 And again, open shape3.BMP, Copy and it and then Paste it like before. Delete the black away. But now, goto Image > Adjust > Hue/Saturation. Check Colorize, and set Saturation at 0. Click ok. Now set this layer's opacity at 33%. Name this layer Shape 3. |
 |
 This is where things get tricky. Open shape3.BMP once more, Copy & Paste it, and now goto Edit > Transform > Flip Horizontal. Now, move this shape into the top right hand corner, and fade the edges away by slecting the eraser tool, and on the top, you shoudl see a drop menu, choose Airbrush. And set opacity of it on 20%. And fade those edges away. Name this layer FlippedShape3. And set the opacity of it to 40%. |
 |
| *PLEASE READ: Bare with me, as I was writing this tutorial, I only changed the colors of the shapes, so don't think I did anything different then you did. I simple went to Image > Adjust > Hue/Saturation to change the colors. I realized the colors I was working with weren't nice looking. So you don't have to do that, and don't think you missed any steps. |
 Ok, now you can open shape4.BMP, Copy and Paste it, then Delete the black background with the magic wand tool again. Now move the shape to the bottom right hand corner, as shown in the picture. And erase(with the airbrush setting) those fin looking things, and any jaggies you see. Name this layer Shape4. In the layers pallette, open the drop menu, set it on screen, and set the Opacity to 30%. |  |
 Now open shape4wire.BMP, Copy and paste. Deleter the black background again, and try to align it with the image in the bottom left hand corner. Now in the layers Pallette, choose Screen from the drop menu, and set the opacity to 10%. Name this layer Shape4 Wireframe. | |
| Alright, you're done with the basic abstract part of this. Now you will add some cool effects from Filters and such. |
 Alright, now open shape3.BMP. Copy and Paste it like you have done before. Delete the black background again. Now goto Filter > Blur > Radial Blur. Set the amount to 15. Click OK. Now move this to the bottom left hand corner, like shown in the picture. Now in the layers pallete, choose Soft Light from the drop menu, and set the opacity to 80%. Name this layer Radial. |  |
 Open bgwire.BMP, and Copy and Paste, delete the black etc.. Now move it into the top right hand corner, and using the Eraser(Airbrush setting, about size 200), fade those edges away. Use the picture to the right as your guide if needed. Set the opacity of this layer at 10%. Name it Wire Effect. | |
 Ok now we're going to add some scan lines. Create a new document(File > New), set the height at 2 pixels, and the width at 1 pixel. Dot Transparent. Click OK. Now set white as your foreground color. Zoom in 800%, and select the pencil tool. Make sure the setting for the pencil tool is 1 pixel(the lowest setting). And now just click on the top square, which will have draw a dot on that top square. Now select the whole thing with the Rectangular Marquee Tool, and goto Edit > Define Pattern. Click OK. Now go back to your wallpaper, and create a new layer. name this layer Scanlines. Goto Edit > Fill. Choose pattern from the drop menu, and you should see another drop menu, with the different patterns inside of it. Choose the scanline pattern you made, should be the last one. Now click OK. Set the opacity of this layer to 3%. | |
 Okay now to add those gridlines you see everywhere. Goto the Channels Pallette(Windows > Show Channels). Create a new channel. Should be named Alpha 1. Now hold your mouse down on the Rectangular Marquee Tool, and click the Single Row Marquee Tool.  . .Now on your canvas, click, and drag it to the middle of it somewhere. Now goto Edit > Fill. Choose White from the drop menu, and click OK. Now hold your mouse down on the Rectangular Marquee Tool again, and choose the Single Column Marquee Tool. Drag it to the middle of the canvas somewhere, and goto Edit > Fill. White, click OK. Now, choose the Rectangular Marquee Tool, and make a small box around where the 2 lines intercect. Now goto Edit > Define Pattern, click OK. With the rectangular marquee tool, select the whole canvas, and press delete. Keep the canvas selected, and goto Edit > Fill. Choose pattern from the drop menu, and choose the gridline pattern you just made, should be the last one. Click OK. Now hold CTRL, and click on Alpha 1 in the Channels pallette. This should select all of the little squares, keep them selected. Now go back to the layers pallette, and create a new layer. Name this layer Gridlines. Choose a foreground color of your choice, and goto Edit > Fill. Choose foreground color from the drop menu, click OK. Now select the Eraser tool, and set it on Airbrush, with a 20% opacity. Set the brush size on 200. Now go around erasing sections of the gridlines. Erase most of it, you don't want them covering the whole wallpaper, it will look nasty. After you've done that, set the opacity of the Gridlines layer to 8%. |  |
| OKAY, you are done with the outline of your wallpaper! Now for the best part, TRENDINESS! Well I can't give you step by step instructions on how to make this trendy, but I will give you instructions on different objects and typography you can add to make your wallpaper trendy. |
|
Small Typography: Well you've seen loads of wallpapers have that small writing and typography, well its very simple. Here's how. Choose the Text tool, and choose a pixel font. If you don't have a pixel font, you can just use Arial or Verdana. They work well. I used 04b_08. Now, set it on size 3. You won't see size 3 as a selection, so you will need to type it in. Now click the type tool onto the canvas and write stuff. Doesn't matter what. I wrote: "fuwqfnwiuefbiwubfw wefwe fwefwefwefwet4rt ergergehrehgwy wef wefwegweg wt r grger de erg er ergerg erhe niun iun ds csddsvsv vgreger ergerg" Set the opacity pretty low. See how simple that is? | |
|
Lines and Boxes: Ok now you need to surround that typography with some of those cool lines with boxes coming off of them. Doesn't have to surround the text, in fact I encourage you to add alot of this to your wallpaper, and its fast and simple. Simply choose the Pencil tool, and zoom in 800%. Now just draw a line, decent size, and then draw a few boxes on it, and you can do diagonal lines, and things like that. It looks real nice when you do it the right way. Look at the picture to the right. Set the opacity pretty low. See how simple that is? |  |
|
Circles: You can add some circles to your wallpaper by selecting the Circular Marquee Tool, and making a circle. Fill it with the color of your choice. Now goto Select > Modify > Contract. Enter 1 and click ok. Now hit delete. You're done. One thing I like to do is make the circle, and then use the eraser tool on airbrush, and delete about half of it, and fade the 2 ends. Set the opacity pretty low. See how simple that is? |
| Well after you've trended your wallpaper up.... YOU'RE DONE! You can add text as you please. Feel free to add any effects you want. I think this tutorial helps you learn the tools pretty well. Thanks for using my tutorial. |